Internet access through a WireGuard VPN tunnel
What should the settings be so that clients connected via the WireGuard VPN have access to the Internet?
Importante
This configuration increases the load on the VPN channel and the Internet channel, to which Keenetic is connected as a VPN server.
Allowed IPs
0.0.0.0/0must be specified in the client peer settings. If the client is a Keenetic router, the 'Use for accessing the Internet' option should be enabled in the interface parameters.Also, the client side configuration must have a DNS server specified (e.g. Google's public DNS server address
8.8.8.8).Nota
The client of WireGuard VPN-server can be a Keenetic router, mobile devices based on Android and iOS, or computers based on Windows, Linux, macOS.
On the server side, which should be used to access the Internet, the following settings are required.
Nota
In the case of WireGuard, it does not matter who the server is in this scheme, i.e. who accepts the connection and initiates it. But usually, it's the server that's waiting for the connection.
You must assign the private security level to the WireGuard interface. To do this, you need to enter the following command in the command-line interface (CLI) of the router (in our example, for the
Wireguard0interface):interface Wireguard0 security-level privateAlso, the network address translation (NAT) option must be enabled for the interface. To do this, you will need to enter the command:
ip nat Wireguard0These are necessary and sufficient conditions. The settings on the server should be saved with the command:
system configuration saveKeep in mind that changing the tunnel interface's security level from public to private causes a change in the rules for traffic transfer to this interface from other local networks of the router and back. You can find the settings needed to resolve this situation in the note to the Network segments article.
For traffic from hosts connected to the tunnel to be sent to the local segment, you must add a permit rule on the tunnel interface in the incoming direction. In this rule, the range of addresses on the local network segment must be specified as the destination.
As this setting, the rule that allows all incoming traffic, which we set up on the tunnel interface in the Configuring a WireGuard VPN between two Keenetic routers article, will be suitable. After changing the interface security level configured by this instruction, the firewall rule will remain and continue to perform another function.
In addition to configuring static routing, you will also need to add permit firewall rules on each local segment. In these rules, the destination addresses must include host IP ranges on remote networks behind the tunnel that require access from this local segment.
Example
Consider an example where clients connected to a Keenetic router that acts as a VPN client will access the Internet through this VPN tunnel. In other words, from the VPN client, all traffic will be routed to the WireGuard tunnel, both to access the remote network and the Internet.
Take the scheme shown in the manual Configuring a WireGuard VPN between two Keenetic routers as a basis.
On the VPN server, change the security level of the
Wireguard0interface and enable the automatic address translation rule for it.interface Wireguard0 security-level private ip nat Wireguard0 system configuration saveIn the web interface, add permit rules on the local network interfaces to allow traffic to pass through the network behind the remote router. Permission to send traffic to the VPN client's local network:
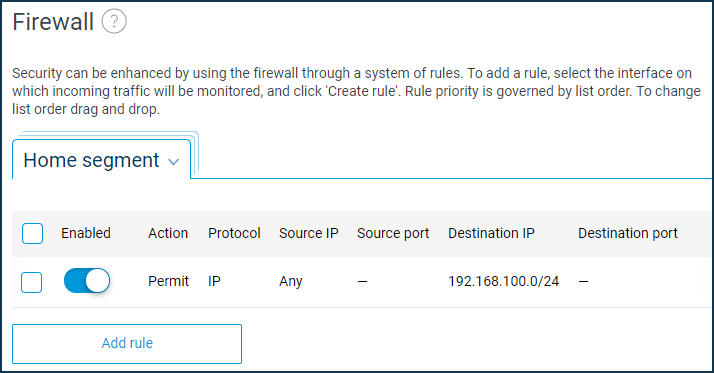
And on the VPN client side, add a permit rule for the Home network to allow traffic to the VPN server's LAN.
For a VPN client, it is necessary to correct the configuration of the WireGuard interface. It is required to add the address space
0.0.0.0/0to the allowed networks. In the configuration of the interface itself, enable the 'Use for accessing the Internet' option and specify the DNS server(s). In our example, we specified a public Google DNS server (8.8.8.8), but you can also use local addresses available in the tunnel, such as the VPN server's address (172.16.82.1).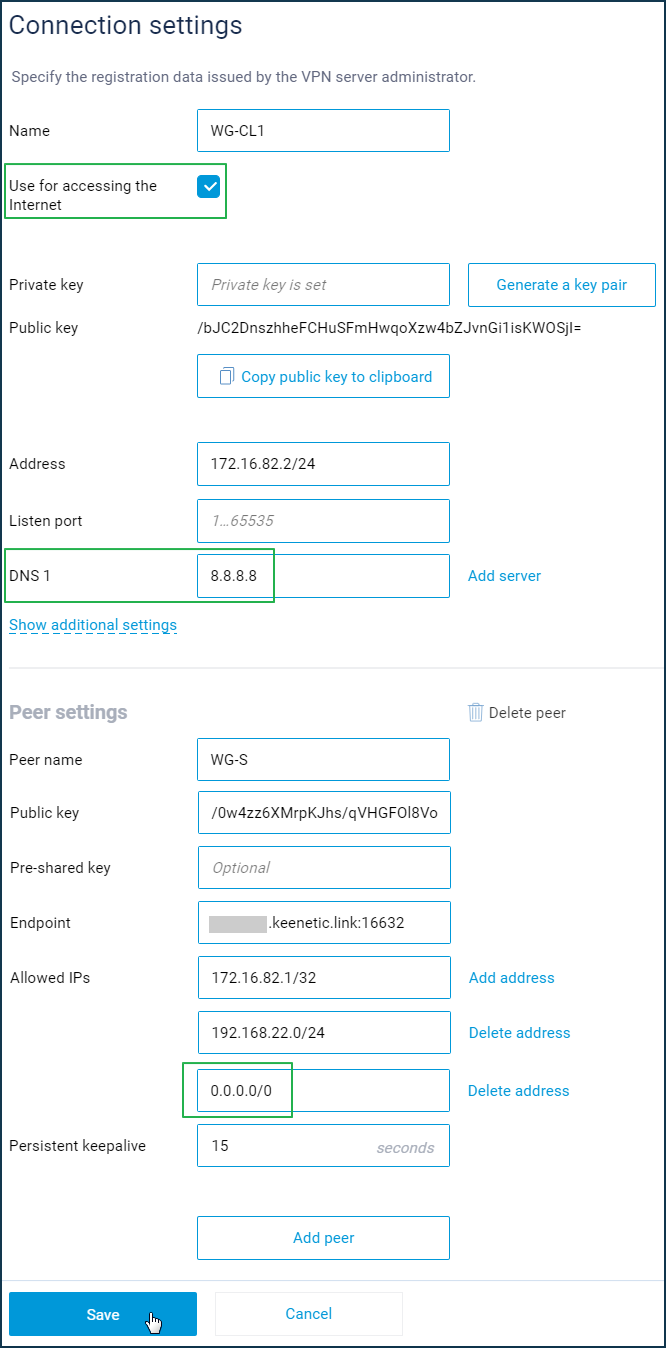
Save the setting.
The WireGuard interface will appear on the VPN client in the 'Internet' menu on the 'Connection priorities' page. Drag and drop it to the top of the list to make it the primary connection.

After that, all clients connected directly to the Keenetic router will access the Internet through the VPN tunnel. If you need to configure access only for some devices, in this case, we recommend you to create an individual profile and bind specific devices to it. How to do this is shown in the 'Connection priorities' instruction.
The setup is complete.
Nota
To disable the configured feature, all you have to do is enter the commands on the VPN server interface Wireguard0 security-level public and no ip nat Wireguard0, then save the settings with the command system configuration save. On the VPN client, for the WireGuard interface, you need to disable the 'Use for accessing the Internet' option and remove the 0.0.0.0/0 network from allowed.
Firewall rules and the specified DNS servers will not interfere with the configuration from the article 'Configuring a WireGuard VPN between two Keenetic routers' too.