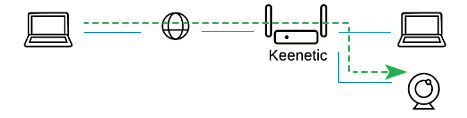
Internet access to an IP camera connected to a Keenetic device
When connecting network cameras or video recorders ('IP cameras') to Keenetic routers, you often have to provide Internet access to the cameras' web interface to control and monitor the video stream.
Let's have a look at the three most popular ways to access IP cameras remotely:
The most reliable and safe way. If you have a public IP address for Internet access, add one of the L2TP/IPsec or PPTP VPN servers to your Keenetic to access your local network and the IP camera.
The simple but not safe way. If you have a public IP address to access the Internet, configure port forwarding on the Keenetic (sometimes they say 'need to open a port on the router' or 'configure port forwarding' appear).
Access the IP camera web interface via our KeenDNS service using a 4th level domain name. This method applies if you have a public IP address to access the Internet (KeenDNS in the direct access mode) and a private IP address (KeenDNS in the cloud access mode). Please note that some limitations are using the KeenDNS in cloud access mode. This information you can find further in the text. Also, if you have a private IP address, you can enable the SSTP VPN server, which operates through the KeenDNS cloud service, to connect remotely to local network resources, including IP cameras.
Now let's focus on each option in more detail.
Access to IP camera via VPN server at Keenetic
To connect, you will need:
A public IP address on the router's external interface for Internet access.
Local IP address of the camera and connection port number. You have to find out what port number(s) is used in the IP camera (for example, you can find this information in the settings menu or documentation). It can be a single port, e.g., port
80is used to connect to the web interface of an IP camera or several network ports (80th to access the web interface,TCP/5000to access the IP camera via specialized software andRTSP/554for streaming video).Login and password of the IP camera.
Connect the IP camera to the Keenetic network. Register the device in the Keenetic Web Configurator and assign a static IP address to it. Then enable one of the VPN servers to access the local network — L2TP/IPsec (recommended) or PPTP. We recommend creating a separate user (account) for the VPN connection and using a complex password.
Then connect to the Keenetic VPN server from the Internet. When you connect to Keenetic, you will be able to access the local network, including the camera (you can get access by its local IP address).
We recommend using this method of connection to an IP camera, as it guarantees security when passing traffic over the Internet.
Access to IP camera by configuring port forwarding on the Keenetic
To connect, you will need:
A public IP address on the router's external interface for Internet access.
A local IP address of the camera and connection port number. You have to find out what port number(s) is used in the IP camera (for example, you can find this information in the settings menu or documentation). It can be a single port, e.g., port
80is used to connect to the web interface of an IP camera or several network ports (80th to access the web interface,TCP/5000to access the IP camera via special software andRTSP/554for streaming video).Login and password of the IP camera.
To configure remote access to the IP camera, Keenetic retransmits incoming connections to a specific port or ports of the camera. This connection method does not guarantee security when passing traffic over the Internet. Besides, with this configuration, standard ports can be unlocked on a router with a public IP address, and this is not recommended, because if malicious bots detect such ports, they can lead to heavy 'parasitic' traffic or attack on this address.
Disable UPnP service in the camera and Keenetic settings. To do this, delete the system component 'UPnP service' in Keenetic.
Then configure port forwarding using the port forwarding instruction.
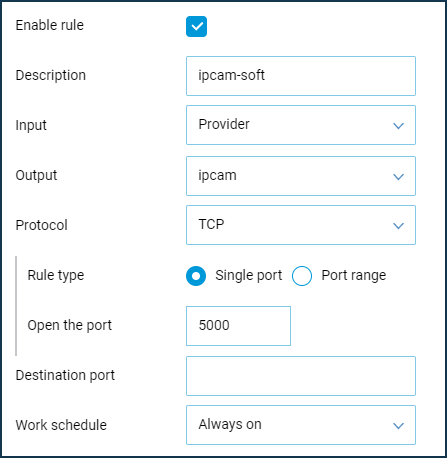
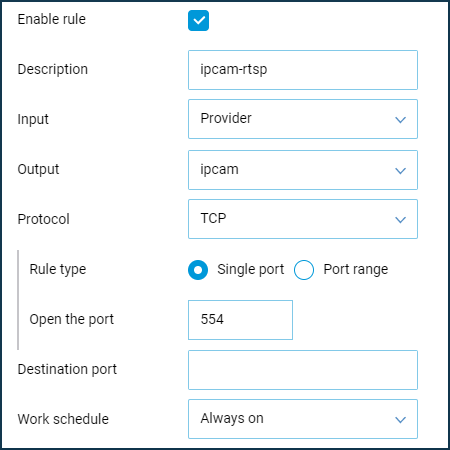
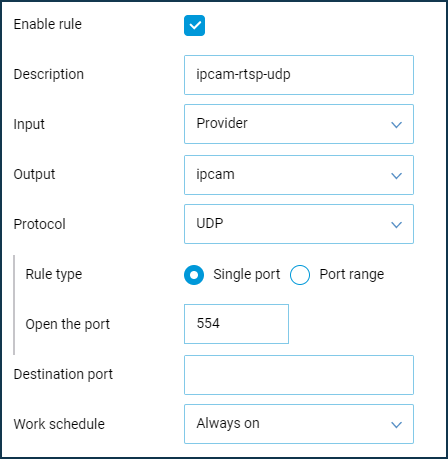
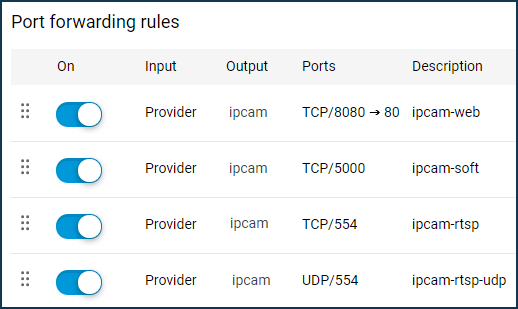
Create a rule(s) by selecting in the 'Input' field the interface you want to use for your Internet connection (in our example, it is the 'Provider' interface). When using a 3G/4G modem, select it from the list.

As both the Keenetic web configurator and the web interface of the IP camera use port 80, let's configure the port mapping to access the web interface of the camera from the Internet on another port (in our example on port 8080).
Then check the port forwarding to the IP camera from the Internet via your browser. In your browser, use the following type of address: WAN_IP_address_Keenetic:port_number
For example 86.87.88.89:8080
You will see the web interface of your camera in a browser.
With our KeenDNS service (in the direct access mode), you can assign your domain name to the Keenetic. In your browser, use the following type of address: domain_name:port number
For example: myrouter01.keenetic.pro:8080
Access the IP camera web interface via our KeenDNS service using a 4th level domain name
This method applies if you have a public IP address to access the Internet (KeenDNS in the direct access mode) and a private IP address (KeenDNS in the cloud access mode).
Configure access to your local network web applications using the example of remote access to home network resources with KeenDNS instruction. There is no need to configure the port forwarding in this case. It will be possible to access the IP camera's web interface from the Internet by using the 4th level domain name (for example, camera.myrouter01.keenetic.pro).
When operating KeenDNS service in cloud access mode, pay attention to the following:
Importante
If the IP camera transmits video via HTTP, the video transmission (picture display) will work via KeenDNS. But if the IP camera uses other protocols for video broadcasting (for example, RTSP (Real Time Streaming Protocol) or RTP (Real-time Transport Protocol)), or the interface requires a special plug-in to support viewing of images from cameras, then video transmission directly through the HTTP proxy cloud service KeenDNS will not work. In such a case, you must use a public IP address to access the IP camera and use the direct access mode in KeenDNS (see method 2) or use a VPN connection for remote access (see method 1). If it is not possible to connect to a public IP service, you can use the Keenetic VPN server SSTP to remotely connect to your local network and IP camera via a cloud HTTP proxy.
Nota
Cloud HTTP proxy KeenDNS allows you to authorize when connecting to local resources on the 4th level domain name by Keenetic means. You can find this information in the article 'An example of remote access to home network resources with KeenDNS'. It is usually used to enable authentication on devices that do not have their login and password authorization. But if you configure it this way, you will first need to pass authorization in the Keenetic and then in the camera's web interface, i.e., to enter the login/password twice for additional protection.