Nota
This article is intended for experienced users only.
This instruction will review the firewall rules configuration from the router's command-line interface (CLI). Theoretical information is covered in detail in the article 'How is the firewall implemented?'. For information on confining firewall rules from the web interface, refer to the Firewall article.
CLI provides additional options for configuring the Keenetic firewall compared to the web interface. A detailed description of the CLI commands for each Keenetic model can be found in the Command Reference Guide available in the Download Center.
The firewall of the Keenetic device executes the filtering rules written in the Access Control List (ACL) on each interface to which this list is bound. Several lists can be linked to one interface.
The following commands are available for firewall configuration:
access-list {ACL_name}— provides access to rule management in the specified access list. If the list does not exist, it will be created.no access-list {ACL_name}— removes the specified list, if it exists.
For example, to move to the list MyList1 editing, the following command is used:
(config)> access-list MyList1
(config-acl)>
Once the access list is created, you can start making its rules. For this purpose, deny and permit commands are used, corresponding to the deny and permit filtering rules. The format of these commands is the same and can be found in the Command Reference Guide.
Importante
Each rule may contain a filter for one of the supported protocols only.
Here are some examples of rules:
A command that enables a filter to allow TCP packets from host
192.168.1.33to be transmitted to any address:(config-acl)>
permit tcp 192.168.1.33/32 0.0.0.0/32A command to prohibit ping from all hosts on subnet
192.168.1.0/24to any other subnet:(config-acl)>
deny icmp 192.168.1.0/24 0.0.0.0/32A command that enables a filter to block IP packets from
192.168.1.0/24to any hosts:(config-acl)>
deny ip 192.168.1.0/24 0.0.0.0/32The command (
permit|deny ip) without specifying the protocol type integrates the TCP and UDP protocols into one common configuration (ip).A command to allow connection to the router's web interface (
192.168.1.1) via HTTP (TCP port 80) from any host from the Internet:(config-acl)>
permit tcp 0.0.0.0 0.0.0.0 0.0.0.0 0.0.0.0 port eq 80To remove a rule from the list, you need to repeat the command that sets it, but with
noin front of it.For example:
(config-acl)>
no permit tcp 0.0.0.0 0.0.0.0 0.0.0.0 0.0.0.0 port eq 80
The exit command is used to exit the access list editing.
A completed list of rules, using the above commands, in the configuration file of the router will look like this:
access-list MyList1
permit tcp 192.168.1.33/32 0.0.0.0/32
deny icmp 192.168.1.0/24 0.0.0.0/32
deny ip 192.168.1.0/24 0.0.0.0/32
Having prepared the list of access rules, you should bind it to the required interface of the device. For this purpose the command ip access-group {ACL_name} {direction in|out} is used in the settings of each interface.
Remember that the interface also defines the direction of traffic flow for each list to which these rules will be applied. The direction is determined relative to the interface (the incoming direction in — always to the device, and outgoing out — from it). This information is described in detail in the article How is the firewall implemented?.
For example, bind the created rules to the external ISP interface:
(config)>interface ISP(config-if)>ip access-group MyList1 outNetwork::Acl: Output "MyList1" access list added to "ISP".
In the outgoing (out) direction of the ISP interface (this is the direction from the router to the network of this interface) the transmission of any traffic to any addresses will be prohibited.
A list of rules similar to our example can be helpful when you need to deny access to the Internet via the external interface to all but one host on your local network. In our example, access and ping are denied to all hosts on 192.168.1.0, except for the host with the IP address 192.168.1.33.
Access level settings (security-level) are applied on the Keenetic interfaces, which determine the logic of network screen operation:
private(local);public(external);protected(secure, local).
The following diagram can represent the scheme of allowed and prohibited data directions in the Keenetic routers:
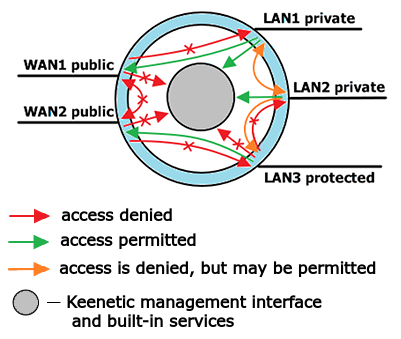
By default, a Keenetic router accepts network connections from private interfaces only. Interfaces of the private type are allowed to establish connections to public interfaces and the device itself for management and access to services running on the router. For the guest network interface, access to the router and its services is denied.
Between private interfaces and between a private and protected interface, by default, it is forbidden to establish a connection, but access can be allowed if necessary. This option depends on setting the isolate-private parameter. If you need to allow connections between private interfaces or between a private and protected interface (i.e. not to isolate access), execute the command no isolate-private.
From the public interfaces, it is prohibited to establish connections to any interfaces, including other interfaces of public type and the device itself.
Interfaces of the protected type are allowed to establish connections only to public interfaces. By default, access to devices of private and other protected interfaces, as well as to device management, is prohibited.
With the command security-level public|private|protected, you can manage access levels on the router's interfaces.
For example:
(config)>interface Bridge3(config-if)>security-level protectedNetwork::Interface::IP: "Bridge3": security level set to "protected".
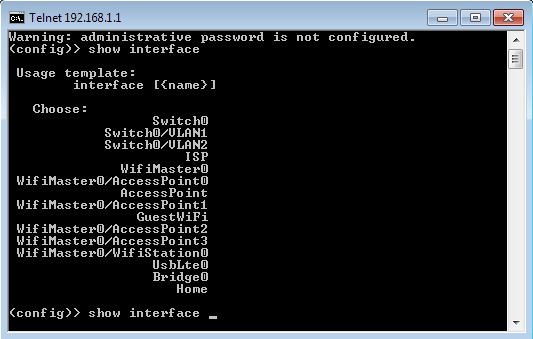
You can identify the security level of the specified interface by executing the command show interface {interface_name}.
For example:
(config)> show interface ISP

               id: GigabitEthernet1
            index: 1
             type: GigabitEthernet
      description: Broadband connection
   interface-name: ISP
             link: up
        connected: yes
            state: up
              mtu: 1500
         tx-queue: 2000
          address: 193.0.174.199
             mask: 255.255.255.0
           uptime: 12433
           global: yes
        defaultgw: yes
         priority: 700
   security-level: public
              mac: 50:ff:20:2d:ed:ea
        auth-type: none
The security-level line specifies the security level according to which the predefined firewall policy works.
Importante
By default, all interfaces newly created via the command line are assigned the public security level.
The list of interface names and their system identifiers can be viewed as follows: type the show interface command and then press the TAB key on your keyboard. You will see the list of all currently available interfaces of the device, including the preset service interfaces.
Nota
Keenetic router supports IPv6 and IPv4 protocols. Only minimal settings are provided to manage the IPv6 firewall: enable or disable.
You can do this with the
ipv6 firewall(enable), andno ipv6 firewall(disable) commands.By default, the firewall for IPv6 is enabled.
In Keenetic routers, there is an access level
protected. This level of access is analogous to theprivatelevel but without access to the router.The
protectedtype is set for the Wi-Fi guest network interface when the 'Enable access to home network applications' option is disabled in the web interface on the 'Guest segment' page in the 'Restrictions for devices in the segment' section. By default, access to Keenetic is prohibited from the guest network. If you allow access to settings, this interface will be set to theprivatelevel.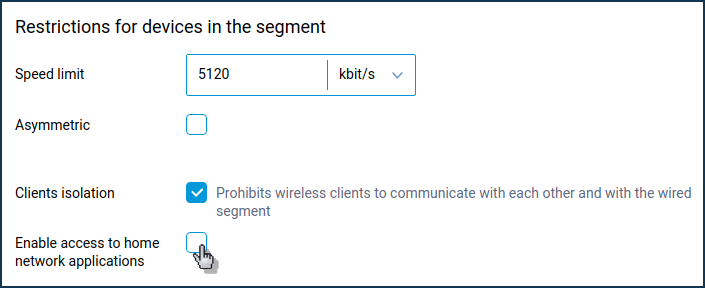
If you need to apply a large number of firewall rules, you can configure the rules by editing the startup-config.txt configuration file with any text editor. After saving changes, you need to upload the file back to the device and reboot it. But you should edit the configuration file very carefully because it can lead to an inability to control the device, loss of functionality of individual functions, incorrect display of settings in the web interface.
If your device stopped working correctly after loading the edited configuration file, we advise you to reset the user settings with the Reset button and adjust Keenetic again or load a working backup configuration file.