Creating a Wi-Fi System with two Keenetic routers
Connect the Main Router to the Internet. Then, in its web interface, ensure that the 'Wi-Fi System' page is in the 'My networks and Wi-Fi' menu.
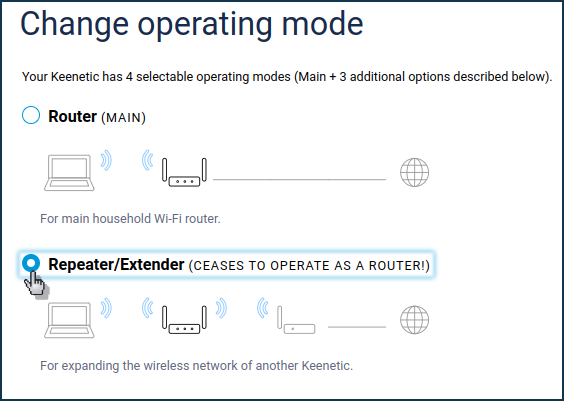
Set the second router to Extender mode.
On the Extender with a hardware switch on the case, perform a factory reset (using the Reset button on the case).
For models without a hardware switch, there is no need to reset.
Connect the Extender to the Main Router by wire or Wi-Fi (via WPS Quick Connect).
In the web interface of the Main Router, add the Extender to the Wi-Fi System.
Unplug the configured Extender from the power supply and install it in the desired location to extend Wi-Fi coverage.
If possible, connect it to the Main Router with a wire. If using a wireless mesh connection, position the Extender in the coverage area of the Main Router or a neighbouring Extender. Check on the web interface of the Wi-Fi System controller (Main router) that all nodes in the system are connected, and client devices are successfully switched between them.
See detailed instructions for connection and setup: Connecting extenders to Mesh Wi-Fi System.
Example
Let's look at an example of a Keenetic Wi-Fi System based on a Keenetic Skipper (KN-1910) + Speedster (KN-3010). This set is recommended for city flats, small offices and country houses with a complex layout, several rooms or two floors. When setting up the Wi-Fi System, Skipper will be used as the Main Router and the Speedster as an Extender. The two can be connected using Gigabit cable or wireless mesh technology.
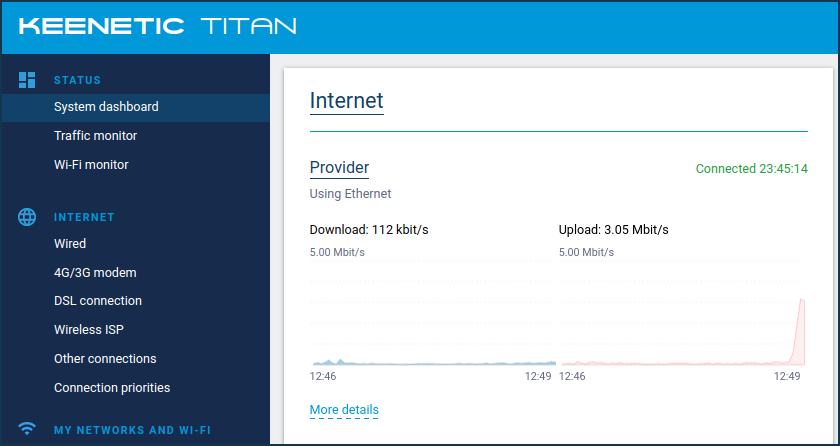
Connect the Skipper Main Router to the Internet. Contact your Internet service provider's technical support or your contract for information on how to connect to the Internet. Keenetic supports a wide range of connection options.
In our example, the most common type of connection to the Internet using IPoE technology without a login and password is used. A dedicated Ethernet cable from the internet provider is connected to the blue network
port 0(Internet).Make sure that the Internet LED
 on the router is lit. Then check the Internet connection from a computer or mobile device connected via Keenetic.
You can connect to the router's web interface and make further settings if necessary.
Ensure the 'Wi-Fi System' page is in the 'My networks and Wi-Fi' menu. This means that the 'Wi-Fi system controller' component is installed on the router. If the page is missing, install that component. You can do this in the 'System settings' menu under 'KeeneticOS update and component options' by clicking on 'Component options'.

Important
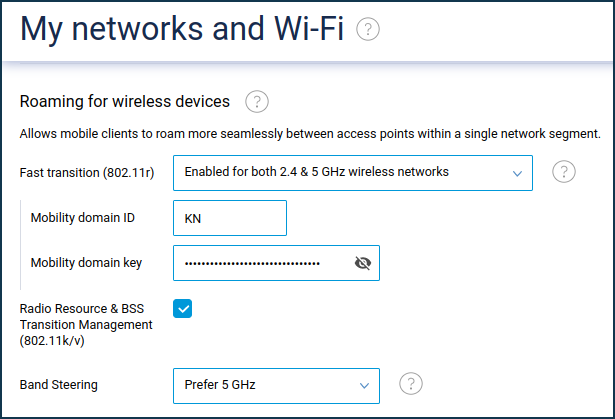
Before connecting an Extender on the Main Router, activate the settings for seamless Wi-Fi roaming (on the 'Home segment' page). These settings will be automatically transferred to the Extenders once the Wi-Fi System is switched on.
In the seamless roaming settings, we recommend enabling 802.11r (FT) for both 2.4 and 5 GHz bands, 802.11k/v BSS environment management and setting Band Steering to 'Prefer 5 GHz'. Generally, these settings are the most optimal and universal for the operation of most modern wireless devices.
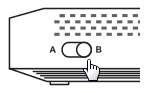
On the additional Speedster router, activate the second operating mode with the A/B switch, setting it to B — Extender.
Note
For models that do not have a hardware switch, enable the operating mode via the web interface. On the 'General system settings' page, under 'Change operating mode', click 'Change operating mode' and set the Repeater/Extender mode.
On the Extender with a hardware switch on the body, perform a factory reset (using the Reset button on the body).
Models without a hardware switch do not need to be reset.
Connect the Extender to the Main Router with the supplied cable. Use any free switch ports on both devices.
When the connection is successful, the Internet LED
on the Extender body should illuminate.Open the web interface of the Main Router, go to the 'Wi-Fi System' page and click 'Acquire' to add an Extender.
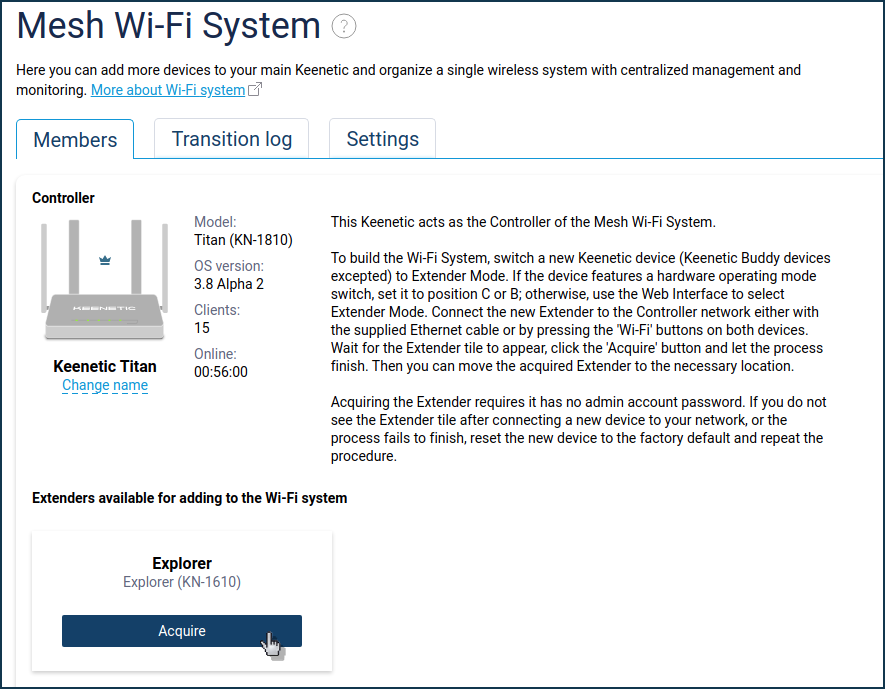
The Extender's operating system may be updated at the time of acquisition. Wait until the process is completed.
Tip
If, for some reason, the Extender does not appear in the list of available to add or is not acquired into the Wi-Fi System, we recommend performing a factory reset on it and then reconnecting and acquisition.
Disconnect the Extender from the Main Router and move it to the desired location in your home or office to increase Wi-Fi coverage.
The Internet LED
on the Extender will be lit steadily when successfully connected to a single wireless network.Tip
If possible, connect the Extender to the Main Router by wire, in which case the whole network will work without performance loss.
If using a wireless Mesh connection, place the Extender in the coverage area of the Main Router. If using a dual-band model as an Extender (Explorer, Speedster, Buddy 5/5S) when taken into a Mesh Wi-Fi System, the wireless connection between routers will only work in the 5 GHz band (this is currently the current limitation of the Wi-Fi system design).
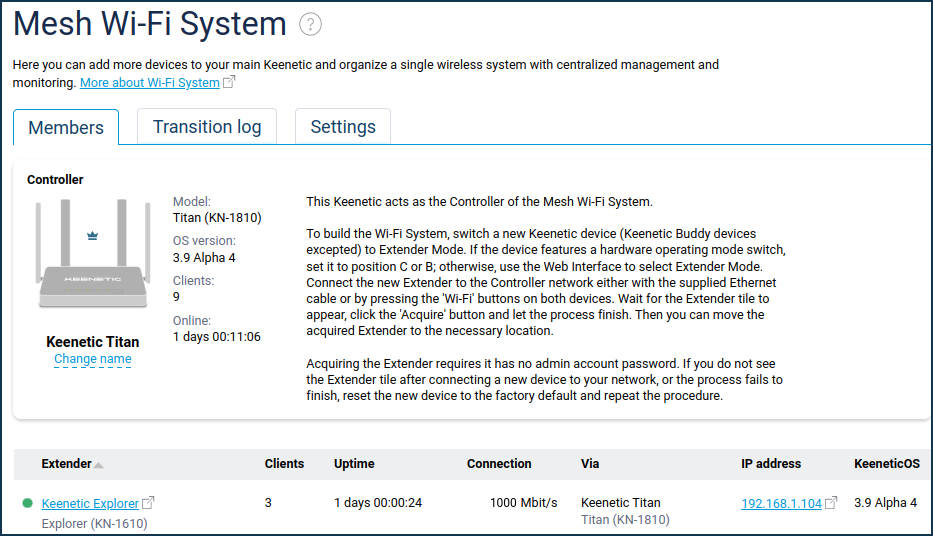
In the Main Router's (Controller's) web interface, make sure that all nodes in the Wi-Fi System are connected, and client devices are successfully switched between them. Here you can also see the link quality (
link speed) between the Extender and the Main Router.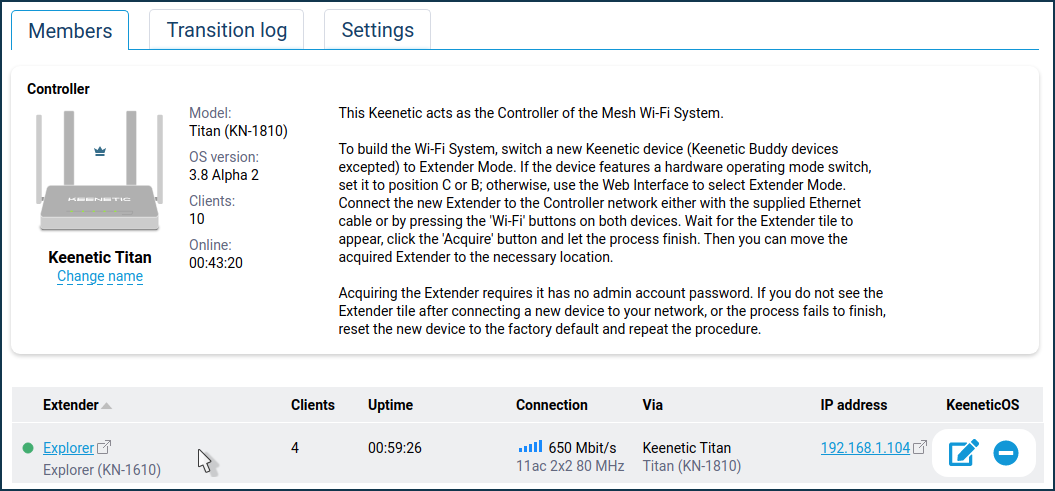
If necessary, you can access the Extender interface by clicking on its IP address link. When connecting to the Extender, use the password of the administrator account set on the Main Router.

Note
Basic network settings will not be available on the Extender for editing. These can only be changed on the Wi-Fi System Controller.
By default, the Wi-Fi System Extenders are assigned a random IP address from the Controller, but you can manually set a specific permanent address if required. The article Static IP address assignment on Wi-Fi System extenders shows how to do this.
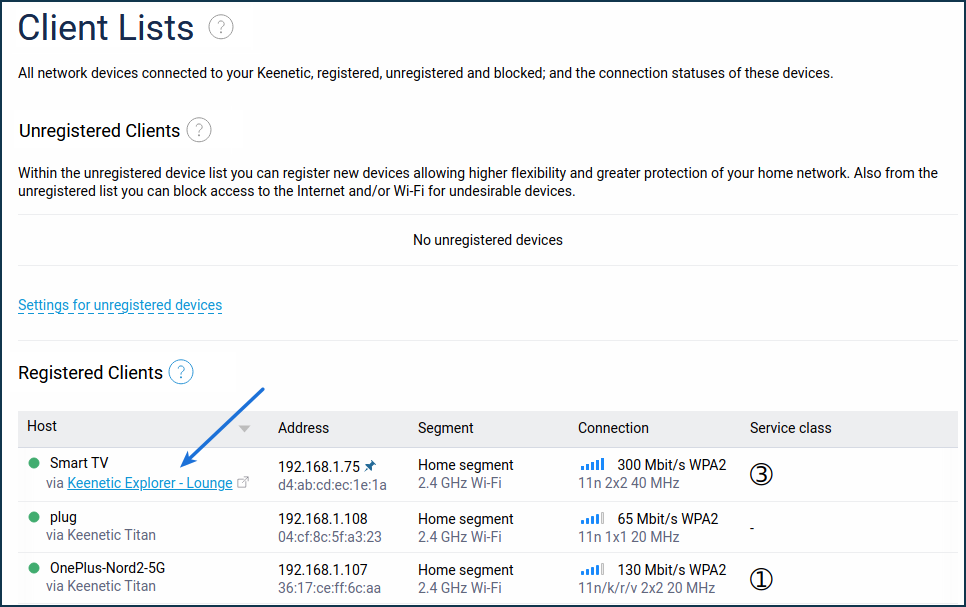
On the 'Client Lists' page, you can see which node the network clients on the Wi-Fi System are connected to.
On the 'Wi-Fi System' page, the 'Transition Log' tab displays wireless clients transitions between Wi-Fi System nodes.
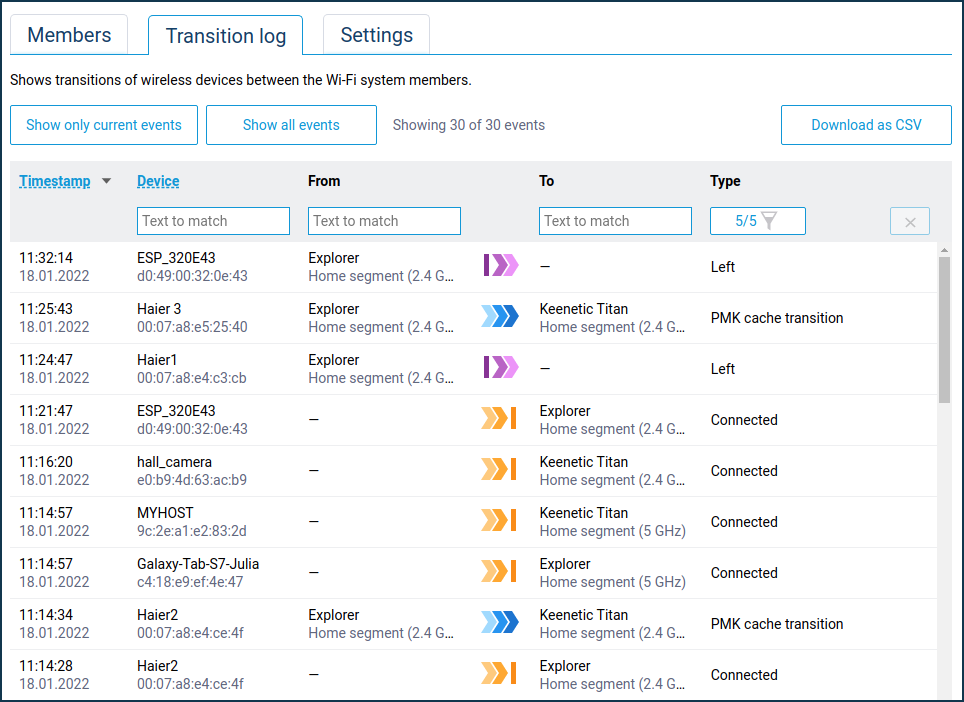
The following events are recorded:
Connected;
Left;
Transition — standard transition without 'accelerators', the client disconnected from one point and connected to another;
PMK cache transition — fast transition using PMKID cache, Pairwise Master Key Identifier;
Fast transition — the fastest transition with 802.11r and FT mode.
Important
The Wi-Fi System uses
802.11r/k/vprotocols to switch clients between APs automatically. Still, in reality, the quality of seamless Wi-Fi roaming is very dependent on the client's hardware and the presence/absence of support for these protocols. On clients without802.11rfast roaming protocol support, Keenetic routers can use PMK cache transition.
You can find more information in the Setting up Mesh Wi-Fi System article.