OpenVPN client and server
OpenVPN is one of the most popular protocols for VPN connection. It can be used to create a virtual private network or to interconnect local networks. OpenVPN is open source and distributed free of charge under the GNU GPL license. It provides faster connection speeds than other VPN protocols. In addition, OpenVPN can be called one of the safest protocols. All transmitted data is securely protected by the OpenSSL encryption library and SSLv3/TLSv1 protocols, which provides high security and anonymity.
Keenetic router features TCP and UDP mode for OpenVPN connection, TLS authentication, use of certificates and encryption keys to increase the security of VPN connection.
Important
Keenetic router that will host the OpenVPN server must be connected to the Internet with a public IP address, and when using the KeenDNS domain name, it must be configured in Direct access mode. If any of these conditions are not met, it will not be possible to connect to such a server from the Internet.
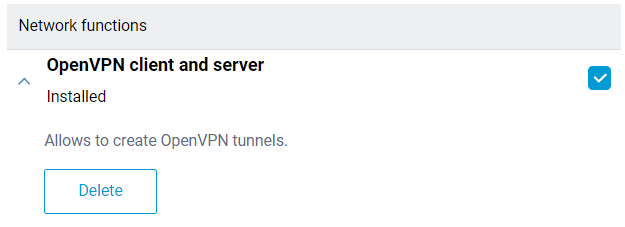
Installing the system component 'OpenVPN client and server' is necessary to configure the OpenVPN connection. With this component, you can use both client and OpenVPN server in your Keenetic. You can install the system component on the 'General system settings' page in the 'Updates and components' section by clicking 'Component options'.
The OpenVPN mode (client or server) is mainly defined by its configuration file.
Important
OpenVPN configuration requirements for use in Keenetic:
The configuration must be in a single file.
Certificates, keys, etc., should be included in this file.
In the configuration, you should use only the options listed in the document: OpenVPN 2.4 ManPage.
Some of the options described above may not be supported. For example, our OpenVPN implementation does not support options related to IPv6.
The order of the options and the certificates and keys enabled do not matter.
OpenSSL keys must be set without a password because Keenetic's interface does not have an option to enter it.
The OpenVPN configuration file is not saved in the
startup-configconfiguration file. To get a backup of the OpenVPN client interface settings, you must save it separately.
The number of client connections is limited by the allocated service memory partition size of 24 Kbytes for storing VPN configurations. This is especially important for OpenVPN connections because the total size of their configurations must not exceed 24 Kbytes.
Let's consider an example of connecting OpenVPN of the 'site-to-site' type.
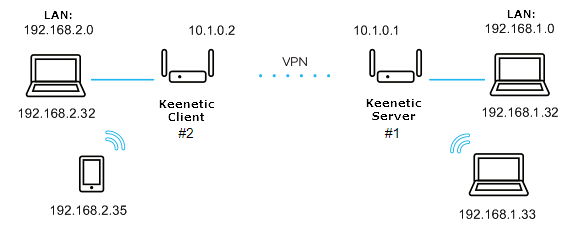
We will connect the Keenetic#2 client (Home-segment 192.168.2.0/24, tunnel address: 10.1.0.2) to the server on Keenetic#1 (Home-segment 192.168.1.0/24, tunnel address: 10.1.0.1)
First, let's look at the simplest configuration using a shared secret key.
The minimum configuration of the OpenVPN server for Keenetic#1:
dev tun
ifconfig 10.1.0.1 10.1.0.2
cipher AES-128-CBC
<secret>
  <--insert the secret key here
</secret>
verb 3
route 192.168.2.0 255.255.255.0
The minimum configuration of the OpenVPN client for Keenetic#2:
dev tun
remote KEENETIC-1.mykeenetic.net <-- server's domain name or IP address
ifconfig 10.1.0.2 10.1.0.1
cipher AES-128-CBC
<secret>
  <--insert the secret key here
</secret>
verb 3
route 192.168.1.0 255.255.255.0
or
redirect-gateway def1
or
route 0.0.0.0 0.0.0.0 <-- if it's neccessary to route all the traffic in the tunnel
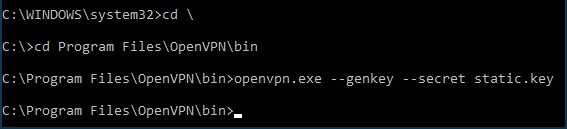
Generate a shared secret key. To do this, download and install OpenVPN from here: openvpn.net/downloads.html
In this example, we will be using version
2.4.6-I602for Windows.After installing the software, restart the computer.
By default, the program will be installed in the
C:\Program folder.Run the Windows command line as an administrator. Go to
C:\Program Files\OpenVPN\binand run the command:openvpn.exe --genkey --secret static.key
Open the generated
static.keyfile with the shared secret key in any text editor (e.g. Notepad), copy its contents to the clipboard (Ctrl-A,Ctrl-C) and paste (Ctrl-V) into the appropriate locations of the client and server configuration files.Examples of
static-server.ovpnconfiguration files for Keenetic#1 andstatic-client.ovpnconfiguration files for Keenetic#2 with shared secret key are attached at the end of this article. There are other commented out (starting with ';') OpenVPN settings in these files which may be used later if necessary. You can use these configuration files for verification by replacing the domain nameKEENETIC-1.mykeenetic.ruinstatic-client.ovpnwith the domain name of your Keenetic#1 or its public IP address and a shared secret key to the one you generated in both files.Go to the 'Other connections' page in the web interface of the 1st Keenetic and click 'Create connection' in the 'VPN connections' section. In the 'VPN connection settings' window, select 'OpenVPN' in the 'Type (protocol)' field.
Then enter the name of the connection in the 'Connection name' field and insert the contents of the
static-server.ovpnconfiguration file in the 'OpenVPN configuration' field. Save the settings.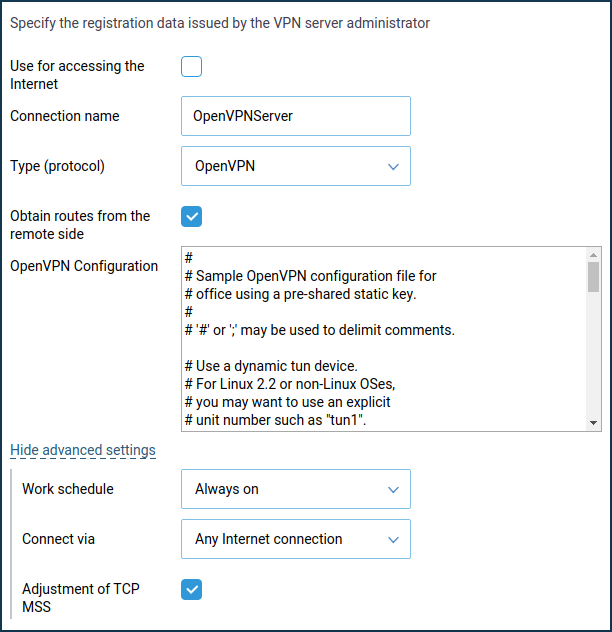
Important
From KeeneticOS
3.4.1the server only works when 'Connect via' — 'Any Internet connection' is specified.In the same way, add an OpenVPN connection to the web interface of the second Keenetic, but with a
static-client.ovpnconfiguration: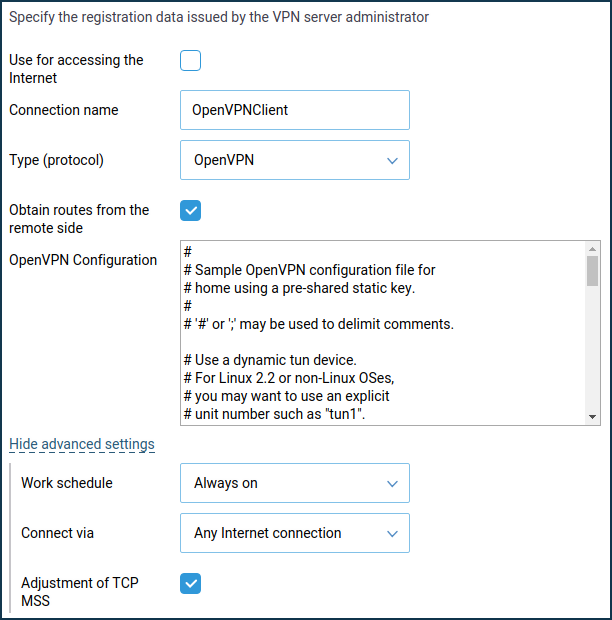
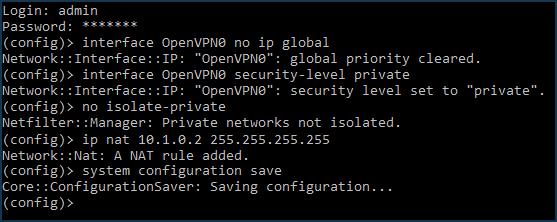
Additionally, on the Keenetic#1 (server) side, the following commands will need to be executed via the command-line interface (CLI) of the router:
interface OpenVPN0 no ip global
interface OpenVPN0 security-level private
To allow traffic between the
HomeandOpenVPN0interfaces, which have a private security level, run the command:no isolate-private
If you plan to use this server to connect the client to the Internet as well, run the command:
ip nat 10.1.0.2 255.255.255.255
and save the settings with the command:
system configuration save
Finally, it is necessary to open a port for OpenVPN connection. The default port is
UDP/1194. To do this, create a rule for the 'Provider' interface or for the interface used to access the Internet on the 'Firewall' page (in addition to the 'Provider', it can be PPPoE, L2TP or PPTP interfaces).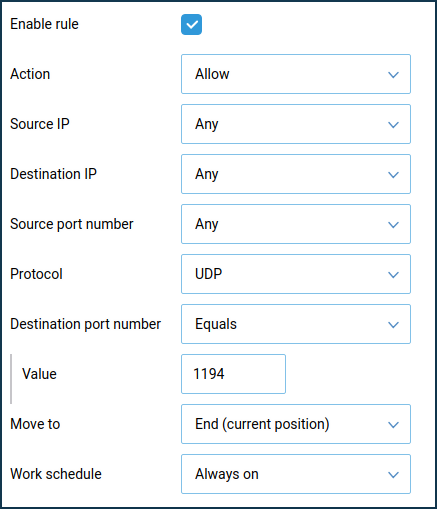
On the 'Firewall rule' window, select 'Allow' in the 'Action' field, 'UDP' in the 'Protocol' field, and 'Equals
1194' in the 'Destination port number' field.
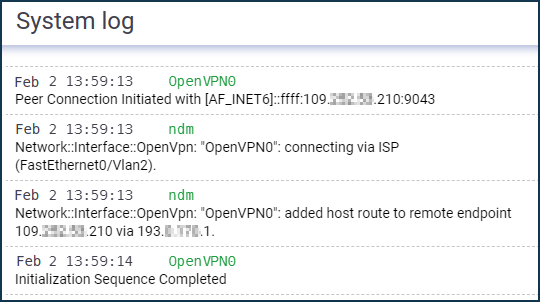
This completes the configuration of the OpenVPN tunnel. Successful installation of the tunnel can be proved by the messages in the System log (on the 'Diagnostics' page):
Try pinging both ends of the tunnel to check:
ping 10.1.0.1
ping 10.1.0.2
and then remote subnets:
ping 192.168.1.1
ping 192.168.2.1
Note
OpenVPN clients connected to the server will be displayed on the 'Device lists' page in the 'Unregistered devices' list. If you have selected the 'No Internet access' policy on the 'Home segment' page in the 'Connection policy for unregistered devices' section, don't forget to register OpenVPN clients if you need to provide them with Internet access as well.
The configuration of the OpenVPN interface is not saved in the startup-config file. For backup purposes, we recommend backing up the OpenVPN settings in a separate file.
If the client connection OpenVPN needs to be used to access the Internet, assign this connection the highest priority. You will find information about priorities in the article "Connection priorities".
Typical errors and solutions:
auth-user-pass without inline credentials data is not supportedThe configuration file contains a line for online login/password entry, which Keenetic does not support. Error in the Keenetic log file:
OpenVPN0 auth-user-pass without inline credentials data is not supported
OpenVPN0 Exiting due to fatal error
Delete or comment out all lines of this kind:
auth-user-passBlock-outside-dnsoption errorThe
block-outside-dnsoption is configured on the OpenVPN server, which is correctly handled only in Windows. Error in the Keenetic log file:OpenVPN0 Unrecognized option or missing or extra parameter(s) in configuration: (line X): block-outside-dns (2.4.4) OpenVPN0 Exiting due to fatal error
Add a line to the OpenVPN client configuration file:
pull-filter ignore "block-outside-dns"Error when connecting to PrivateTunnel servers
An error is displayed when trying to connect:
OpenVPN0 Unrecognized option or missing or extra parameter(s) in configuration: (line 3): client-ip (2.4.4)
Add a line to the OpenVPN client configuration file:
ignore-unknown-option client-ip block-ipv6An error occurs when using the askpass
/storage/key.txtoption:Error: private key password verification failed
This is a limitation of the current OpenVPN implementation in Keenetic. You can only use a key without a password or with a fixed password: '
password'.After updating the router to KeeneticOS
3.9.1, the VPN tunnel to the OpenVPN servers for certain VPN suppliers may no longer be established. You can see the following messages in the system log:W [Dec 15 16:52:58] OpenVPN6: DEPRECATED OPTION: --cipher set to 'AES-128-CBC' but missing in --data-ciphers (AES-256-GCM:AES-128-GCM:CHACHA20-POLY1305). OpenVPN ignores --cipher for cipher negotiations. Error: private key password verification failed
The problem is the outdated encryption format BF-CBC, which is not supported starting from the OpenVPN
2.5.0client version ( KeeneticOS3.9uses the OpenVPN2.6.0client version).Note
The
BF-CBCchipher is no longer supported in the default configuration. The OpenVPN2.5.0version supportsAES-256-GCMandAES-128-GCMciphers by default. You can change this behaviour using thedata-ciphersoption, for example, by specifying in the settingsdata-ciphers AES-256-GCM:AES-128-GCM:BF-CBC. To support very old OpenVPN nodes that do not support cipher negotiation (mode "--cipher"), you can specifydata-ciphers-fallback BF-CBC.When upgrading to a new version of OpenVPN, the setting "
cipher BF-CBC" in older configuration files will be converted with appendingBF-CBCto thedata-ciphersset. In addition, thedata-ciphers-fallbackmode is turned on.To successfully install the tunnel, you will need to change the directive:
cipher AES-128-CBCtodata-ciphers AES-128-CBCordata-ciphers AES-256-GCM:AES-128-GCM:CHACHA20-POLY1305If it doesn't work, then change the directive:
cipher AES-128-CBCtodata-ciphers-fallback AES-128-CBCFor maximum cipher negotiation compatibility with the remote server, specify the following directives:
data-ciphers AES-256-GCM:AES-128-GCM:CHACHA20-POLY1305data-ciphers-fallback AES-128-CBCor
data-ciphers AES-256-GCM:AES-128-GCM:CHACHA20-POLY1305data-ciphers-fallback AES-256-CBCImportant
Encryption depends on the remote OpenVPN server. Before changing the directive
cipher, please look at the system log.If the following key size error is recorded in the log:
[E] Dec 16 19:01:38 OpenVPN0: Unrecognized option or missing or extra parameter(s) in configuration: (line 22): keysize (2.6_git)
[E] Dec 16 19:01:38 OpenVPN0: Exiting due to fatal error
[E] Dec 16 19:01:38 ndm: Service: "OpenVPN0": unexpectedly stopped.Error: private key password verification failed
Then in the tunnel configuration, you need to remove the
keysize 256option directive, which is outdated for the updated client OpenVPN2.6.0, and check the tunnel connection again.You can find detailed information for the "
keysize" option by this link.
We recommend that you read the following information: