Connecting to the Internet via IPv6
To connect a Keenetic router to the Internet via IPv6 protocol, you need no special settings. In most cases, it is enough to install the 'IPv6' system component and enable IPv6 in the settings of the external interface, which you will use for the connection.
Important
For IPv6 connections to work through the router, the ISP must assign an address with the network prefix /48, /56 or /64 to allow delegation of the prefix to the home network. Otherwise, the IPv6 connection through the router will not work.
Some ISPs provide only one IPv6 address without a prefix delegation. Such parameters are designed to connect only one host and will not work through a router.
Mobile operators' USB modems do not support the delegation of prefixes. IPv6 via 3G/4G modem will work only when connected directly to a computer and with one host only.
See the 'Note' section at the end of the article for information on how to find out if a prefix was received.
To set up an IPv6 connection, proceed as follows:
Install the system component 'IPv6' in the web interface of the router.

For more information on updating the components, please see the article KeeneticOS components installation/removal.
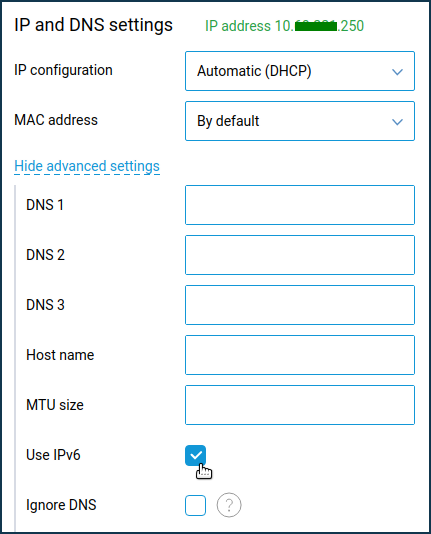
For simple IPoE access with a DHCP server, you only need to enable IPv6. You can do it on the 'Wired' page. In the 'IP and DNS settings' section, click 'Show advanced IP settings'.

In the settings appear, activate the 'Use IPv6' option.
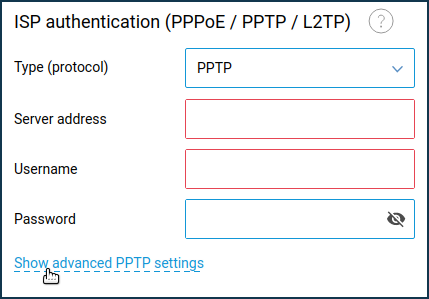
If you are using an authenticated connection (PPPoE, PPTP or L2TP), you do not need to enable this option. In that case, you will need to enable IPv6 in the tunnel connection settings.
If you are using an authentication connection (PPPoE, PPTP or L2TP), go to the 'Wired' page and under 'ISP authentication', click 'Show advanced settings'.
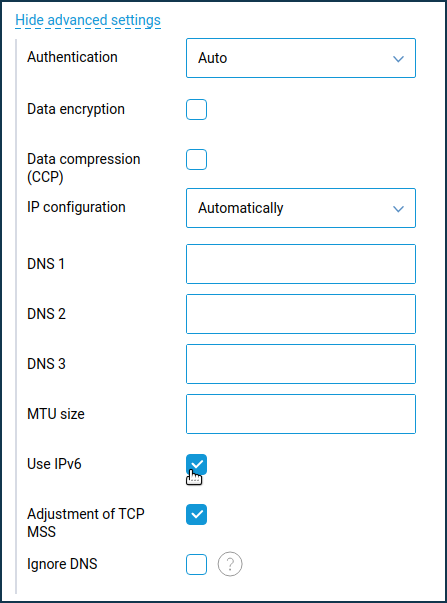
In the settings that appear, activate the 'Use IPv6' option.
After performing the steps above, the Keenetic device should automatically obtain an IPv6 address and DNS servers from the ISP.
On your computer, check whether Internet resources will be available via IPv6.
For example, at the Windows command line, run the command:
ping ipv6.google.com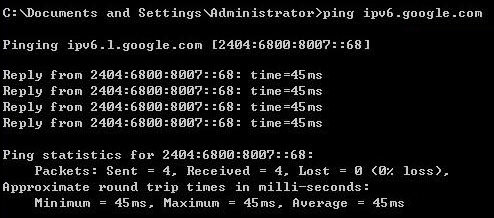
Note
You can view a list of current IPv6 prefixes in Keenetic's command-line interface (CLI) using:
show ipv6 prefixesFor example:
(config)> show ipv6 prefixes

prefix:
 prefix: 2a02:2698:24::/64
 interface: PPPoE0
 valid-lifetime: 86349
 preferred-lifetime: 3549
Or take a look at the system file self-test.txt in subsection 'show ipv6 prefixes'. For example:
<!-- show ipv6 prefixes -->
 <prefix>
  <prefix>2a02:2698:24::/64</prefix>
  <interface>PPPoE0</interface>
  <valid-lifetime>86349</valid-lifetime>
  <preferred-lifetime>3549</preferred-lifetime>
 </prefix>
In our example, the ISP delegated the /64 prefix. The /64 prefix allows using IPv6 addresses only within one segment (for example, only for the Home segment). The /48 prefix allows you to use IPv6 addresses in different segments (for example, in the 'Home' and 'Guest' segments, and additional segments).
Receiving an IPv6 address on the WAN interface is optional. For a router to work with IPv6, the ISP must provide a prefix rather than an IP address.
Here is an example of parameters when the ISP delegated only an IPv6 address without a prefix. In this case, the connection through the router will not work.
<!-- show ipv6 prefixes -->

<!-- show ipv6 addresses -->
 <address>
  <address>2a00:1370:8024::</address>
  <link-local>fe80::5a8b:f3ff::</link-local>
  <interface>ISP</interface>
  <valid-lifetime>infinite</valid-lifetime>
 </address>