Using public DNS servers
Question: What settings do I need to make on my Keenetic so that Internet domain name addresses are defined not via ISP-provided DNS servers but via publicly available public DNS servers?
On the Internet, nodes can be accessed by their addresses (e.g., 2.11.115.99) or by their corresponding domain names, such as keenetic.com. The correspondence between domain names and their addresses is stored in a hierarchical Domain Name Services (DNS) structure. Usually, an ISP automatically provides its users with their own domain server, but in some cases, it may be necessary to use so-called public servers located on the Internet and available to all users.
In KeeneticOS, the module responsible for the DNS Proxy operation aggregates the DNS server addresses received from the ISP and manually configures them according to the specified zones (interfaces) and sends a request for domain name address determination to the most appropriate one. If the address for the domain name has already been determined as a result of a previously received query, it can be stored in the device cache, which provides a faster response.
Next, let's look at the Keenetic router's settings that can be made to use DNS servers on the Internet.
Using public DNS servers directly on clients connected to the router
Two variants of such configuration exist — on the home network clients or on the router.
On computers, the IP protocol parameters are manually configured, and the required DNS server addresses are specified in the configuration of the network interface, e.g. as in the screenshot below. The computer's network interface will receive an IP address and default gateway address from the router automatically but will use the server addresses of the public SafeDNS provider as DNS servers.
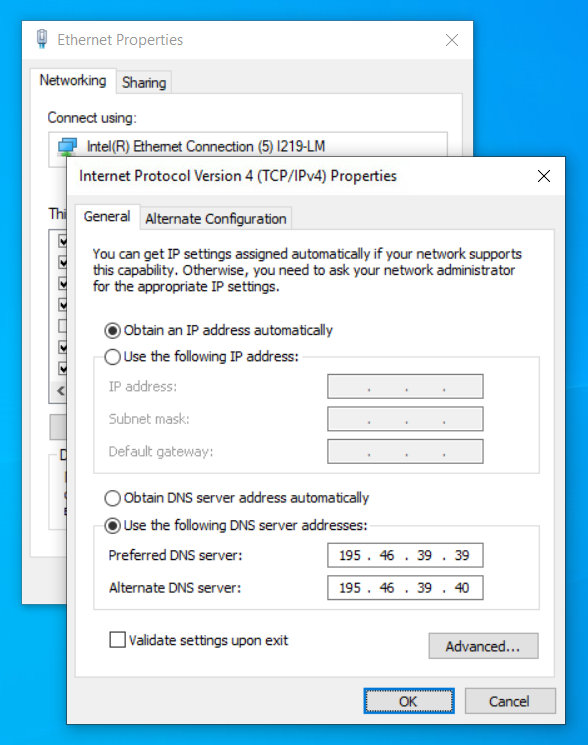
This method can be inconvenient when you need to make settings on a large number of client devices on the network or when different devices are connected to the router each time, for which you need to provide the same access conditions.
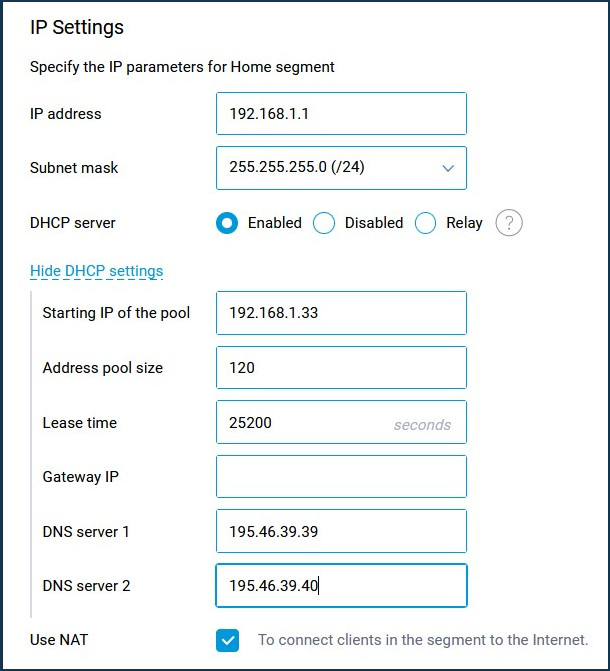
You can specify the required public DNS server addresses in the router's web interface on the 'Home segment' page in the 'IP Settings' section of the DHCP settings, and when you connect clients to its network, the configuration will be performed automatically.
It should be noted that if you use public DNS servers directly on your computers, you will not be able to access the router by the name my.keenetic.net, as well as take advantage of DNS query caching on the router, automatic selection of the optimal server and other DNS Proxy features.
Specifying public DNS servers on the router instead of ISP-provided DNS servers
This configuration will allow you to avoid using your ISP's servers, replacing them with any public DNS server addresses suitable for a particular use case. The configuration is done in two steps.
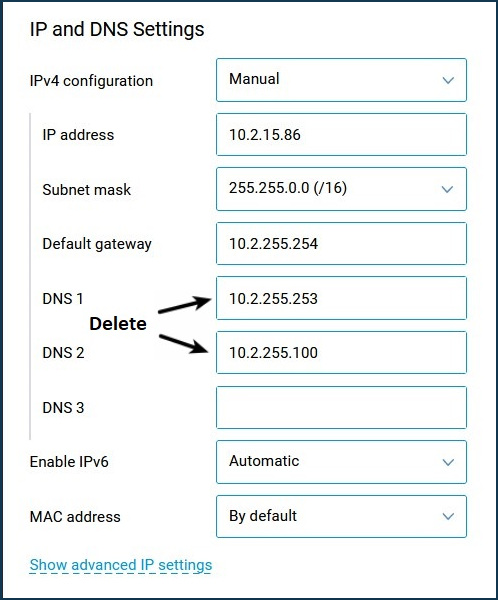
Step 1: Disabling the use of ISP servers.
Sometimes ISPs provide the addresses of their own DNS servers so that they can be included in the configuration manually. In this case, you must delete the DNS server addresses specified in the connection parameters. For example, in the web interface on the 'Ethernet Cable' page, in the 'IP and DNS Settings' section in the 'DNS 1' and 'DNS 2' fields, delete the servers.
Important
When accessing the Internet using authentication, e.g. PPTP/L2TP/PPPoE, pay attention to the details provided by your ISP. If they contain the server address in domain name format, you should not disable DNS servers on the connection used for authentication — usually an 'Ethernet Cable' connection, as it may make it impossible to determine the address of the server providing Internet access. See Note 1 of this article.
Note
Starting with KeeneticOS 3.1, you can enable an option in the web interface to ignore (disable) DNS servers automatically received from your ISP.
You will find detailed information in the instructions “How to ignore your ISP's DNS”.
You can also remove the automatically received DNS servers from the DNS Proxy configuration through the router's command-line interface (CLI):
— IPoE-type interfaces. These interfaces use DHCP (Dynamic Host Configuration Protocol, a set of dynamic host configuration rules) to obtain DNS server addresses. To disable the configuration for the interface named ISP (this is the interface configured in the router for Ethernet WAN connection), please refer to the following configuration methods:
(config)>interface ISP(config-if)>ip dhcp client no name-serversDhcp::Client: ISP DHCP name servers are disabled.
In this case, the DNS address obtained from the ISP will disappear from the list of DNS servers.
To enable DNS server obtaining on the ISP interface, run the commands:
(config)>interface ISP(config-if)>ip dhcp client name-serversDhcp::Client: ISP DHCP name servers are enabled.
— Interfaces with authentication (PPTP/L2TP/PPPPoE). IP parameters in interfaces of this type are usually transmitted from the server via IPCP (Internet Protocol Control Protocol). In order to disable receiving DNS server addresses from the ISP on such an interface, you need to go to its settings using the interface {interface_name} command and execute ipcp no name-servers. For example, for a PPTP0 interface, the commands might look like this:
(config)>interface PPTP0(config-if)>ipcp no name-serversNot using remote name servers.
— Modem interfaces. In the case of using a cellular network via a USB modem, depending on the type of its connection in the device, DNS server addresses can be assigned either by DHCP (for modems operating in Ethernet port emulation mode or NDIS) or by IPCP (for RAS connections). To perform the configuration, go to the command line to manage the corresponding interface and give the command corresponding to the modem type.
— For QMI modems, use the commands:
(config)>interface UsbQmi0(config-if)>mobile no name-serversUsbQmi::Interface: "UsbQmi0": automatic name servers via QMI are disabled.
— If you want to disable the use of DNS servers provided in an OpenVPN-type connection, you must add a line to the configuration of that connection:
pull-filter ignore "dhcp-option DNS"You can check whether the DNS servers received automatically from the provider were successfully disconnected by checking the contents of the configuration file of the DNS Proxy module. To do this, give the device the command:
(config)> more temp:ndnproxymain.conf
rpc_port = 54321
rpc_ttl = 30000
rpc_wait = 10000
timeout = 7000
bantime = 300000
proceed = 500
ban_threshold = 3
stat_file = /var/ndnproxymain.stat
stat_time = 10000
static_a = my.keenetic.net 78.47.125.180
There should be no dns_server entries in the displayed output.
Step 2: Specify the required server addresses manually.
This operation can be performed through the device web interface on the 'Internet Safety' page in the 'DNS Configuration' section.
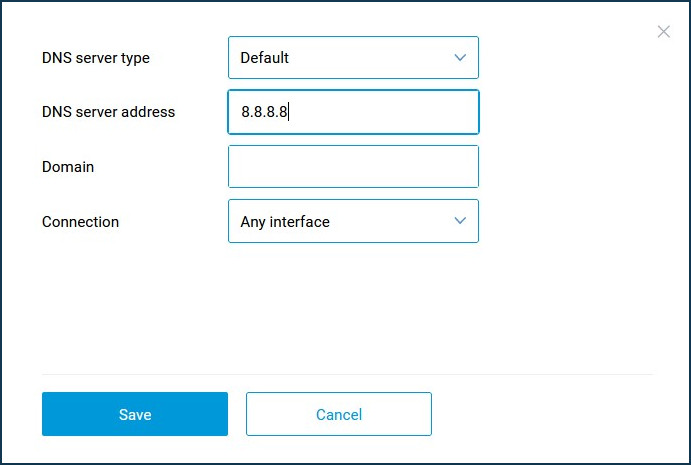
To specify general-purpose servers that will be used when working on the Internet, you should not fill in the 'Domain' field and change the default value of the 'Connection' field. You can specify DNS server addresses through the CLI using the command:
(config)> ip name-server {server address}Its format is described in more detail in the Keenetic Command Reference Guide for your router (the manual can be found in the Download Center section).
After specifying DNS server addresses, the DNS Proxy configuration file will look like this:
(config)> more temp:ndnproxymain.conf
rpc_port = 54321
rpc_ttl = 30000
rpc_wait = 10000
timeout = 7000
bantime = 300000
proceed = 500
ban_threshold = 3
stat_file = /var/ndnproxymain.stat
stat_time = 10000
dns_server = 195.170.55.1 .
dns_server = 141.1.27.249 .
dns_server = 80.252.130.254 .
dns_server = 141.1.1.1 .
static_a = my.keenetic.net 78.47.125.180
You can view information about the currently used DNS servers by using the command:
(config)> show ip name-server

server:
 address: 192.168.100.1
 port:
 domain:
 global: 65522
Note 1
Network configurations vary between access providers. Disabling the automatic acquisition of DNS server addresses in certain cases may result in inoperable tunnel connections, malfunctions of additional services, etc. Before disabling the use of DNS servers provided by your ISP, make sure that they do not contain the domain names of servers used to authenticate your connection. Otherwise, you should check whether it is possible to use the IP address of the server instead of its name. To determine the address of the authentication server yourself, you can use the nslookup program (built into Windows operating systems), for example:
$> nslookup vpn.myisp.com
Server:  UnKnown
Address:  192.168.1.1
Non-authoritative answer:
Name:    vpn.myisp.com
Addresses:  208.48.81.134
          64.15.205.100
          64.15.205.101
          208.48.81.133
In the example above, the server name points to multiple addresses; in this case, we recommend checking with your ISP to see which one you can explicitly set on your connection.
Note 2
The use of public DNS servers, especially if you specify them in the DNS Proxy settings on your router, can, in some cases, reduce the response time of resources on the Internet. A variety of factors can influence this: the location of the servers relative to the Internet access point of your connection, the width and congestion of the channels leading to these servers, the time of day, and others.
Some public DNS servers are listed at WikiLeaks.org, www.lifewire.com. A custom selection of public servers can be found on the theos.in blog.
To determine the most suitable servers among the available ones, you can use specialised software such as DNS Benchmark.
Note 3
When using public DNS servers, incorrect behaviour may occur in browsers and other programs that use Internet connection. We also recommend that you do not use the information in this article for unauthorised purposes.
In addition, please note that when using public DNS servers, information about the queries sent from your device may be available to persons who operate these servers.
Note 4
You can run an online test at http://www.whatsmydnsserver.com/ or https://www.dnsleaktest.com to help you determine which DNS server your queries are going through.
Note 5
When using Internet filters such as SafeDNS, AdGuard DNS, etc., please note that if you disable the DNS server addresses you receive from your ISP and do not manually add DNS server addresses, Keenetic itself and home network devices with 'No Filtering' Internet filter profile will not be able to resolve domain names. In particular, Keenetic will not be able to detect the availability of the Internet, and the corresponding indicator will always be off. At the same time, home network devices with a profile other than 'No Filtering' will be able to resolve names using the DNS addresses of the Internet filter in use.
Note 6
To disable DNS servers from the ISP over IPv6, run the command in the router's command-line interface (CLI):
(config)>no interface ISP ipv6 name-servers autoIp6::Nd::Node: Ignore name servers provided by the interface network. (config)>system configuration saveCore::ConfigurationSaver: Saving configuration...
We have given an example of an IPoE (Ethernet Cable, Wired, ISP) connection. If you are using an authenticated connection (PPPoE, PPTP, L2TP) or via a USB modem, use the interface through which you are connecting to the Internet.
Be sure to consider the case of letters when using interface names in commands. For example, the names of ISP, PPTP0, and L2TP0 interfaces should be specified only in capital letters, while PPPoE0 or UsbModem0 interfaces contain both capital and lowercase letters.
To add IPv6 DNS, run the commands:
(config)>ipv6 name-server 2606:4700:4700::1111Dns::Manager: Name server 2606:4700:4700::1111 added, domain (default). (config)>system configuration saveCore::ConfigurationSaver: Saving configuration...
In our example, a public DNS server from Cloudflare has been added.
Note 7
You can add public DNS servers to Keenetic in different menu items of the web interface. For more information, please refer to the article: Ways to add custom DNS servers.